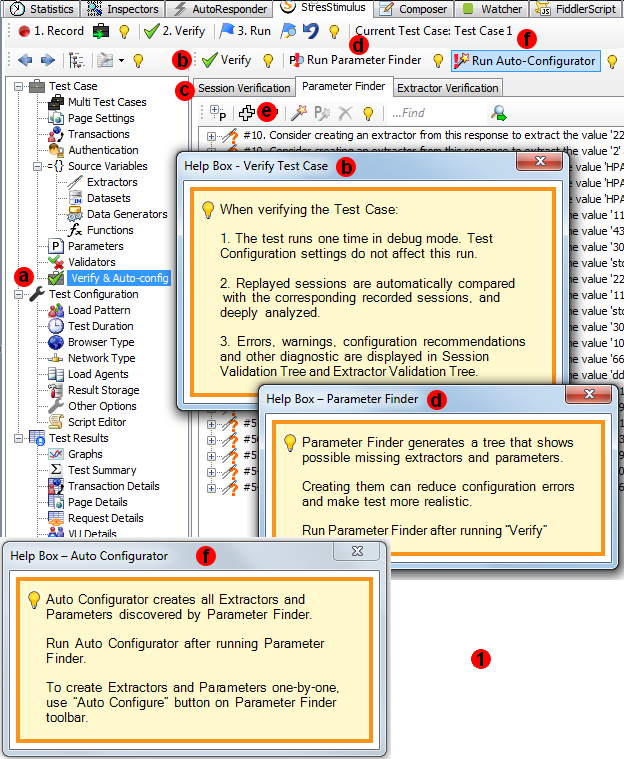
1. 3-Step Auto-Configuration of a Test Case. Test case can be now configured much faster and more accurately using a 3-step process: Verify-> Find Parameters-> Auto-Configure as shown in the video below.
- The first step runs test auto-verification to generate a list of errors and warnings displayed in the Session Verification Tree. This step is invoked from the Verify & Auto-Config section a by clicking Verify button b on the toolbar. The list of errors and warning is displayed in Session Verification tab c .
- The second step finds requests that likely need to be parameterized and gives recommendations about missing extractors and parameters. The second step is invoked by clicking Run Parameter Finder button d . Its result is displayed on the Parameter Finder Tree.
- The last step parameterizes the test case. It can be executed semi-automatically or automatically.
- To run it semi-automatically, on the Parameter Finder toolbar click “Auto-Configure an Extractor and all Parameters for the selected node“ e to create (one by one) multiple groups of objects, each of which includes an extractor with associated parameters.
- To run it automatically, on the Verify & Auto-config toolbar click Run “Auto-Configurator” f to create all extractors and parameters at once.

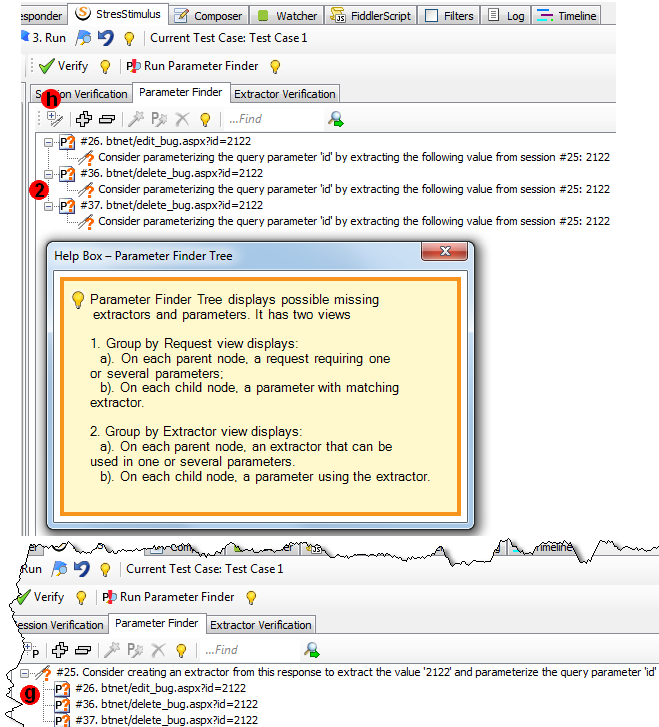
2. Parameter Finder Tree Views: Group by Requests and Group by Extractors. In each of these two views, objects are organized differently:
In the Group by Requests Tree view:
- Each parent node represents a request that likely requires parameterization.
- Each child node represents a pair of:
- i. The missing parameter's name along with the recorded value that should be parameterized.
- ii. The recommended extractor with indication to which prior request should be created from.
In the Group by Extractors view g :
- Each parent node represents a recommended extractor with indication to which prior request it should be created from.
- Each child node represents a request with missing parameter's name along with the recorded value that should be parameterized.
To switch between two views, use the h button.

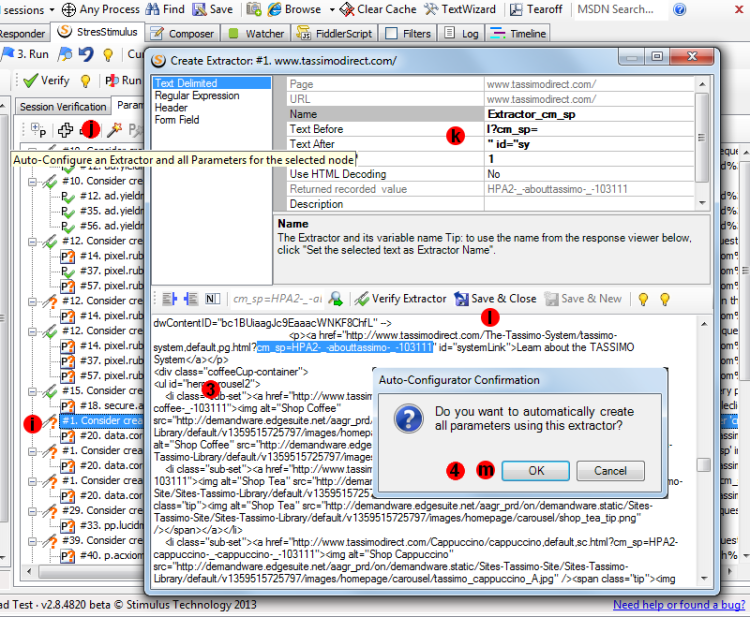
3. Auto-Configurator: pre-configured extractors. Auto-Configurator allows creating an extractor along with all related parameters in one sweep, or creating the parameters afterwards one-by-one.
- j. Click Auto-Configurator button on the toolbar or right-click and select it on the context menu.
- k. In the popup extractor window, the Text Before and Text After properties are already pre-filled.
- l. You can adjust the extractor configuration or simply click save to create the extractor.

4. Auto-Configurator: creating parameters in bulk or one-by-one. After the extractor is created, Auto-Configurator displays a MessageBox “Do you want to automatically create all parameters using this extractor?"
- m. Click OK to create all parameters in bulk automatically or Click Cancel to postpone creating parameters.
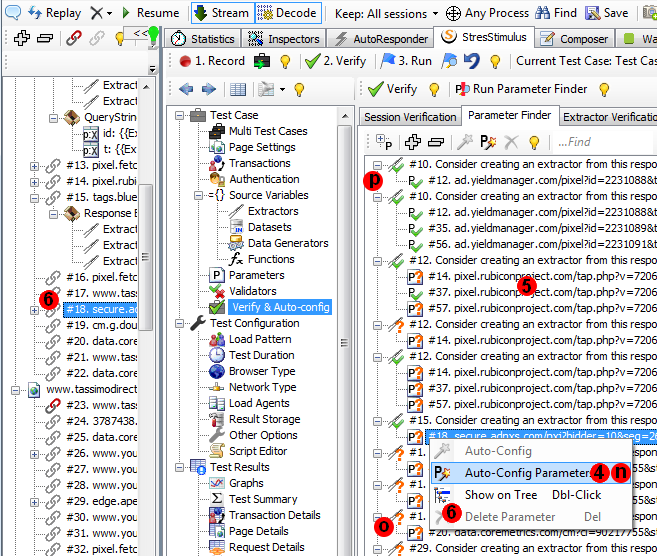
- n. To create parameters one by one, select the parameter, right-click and select Auto-Config Parameter. The parameter will be created automatically.

5. Parameter Finder Tree reflects objects that are already created.
- o. Initially, Parameter Finder Tree designates all missing object with the “?” in the image.
- p. As extractors and / or parameters are created using Auto-Configurator, their respective image is modified to include a green checkbox.
This makes it easier to track configuration progress and watch remaining missing objects. Also, after rerunning Parameter Finder, all created objects will be no longer displayed on the Parameter Finder Tree.
6. Highlighting Parameter Finder Tree objects on the Test Case Three. Right-click any objects on the parameter Finder tree and select Highlight.
7. Parameter Finder support parameters in restful URLs. Previously parameter Finder supported only the string parameters. Now it can also find parameters that can be in any part of the restful URLs. For example, in the URL "http://www.company.com/variable1/fixed", string “variable1“ can be parameterized and on the replay be changed to "http://www.company.com/variable2/fixed".
Read Part 2 -->
To navigate to other parts of the v2.8 release notes, click the links below: